
DHCP Snooping is one of the security features operating at layer 2, it has to be applied in the access layer which directly serves the end hosts.DHCP snooping helps to mitigate the attacks from the rogue dhcp server to assign IP addresses to the endhosts. It should be enabled to meet the security compliance for the organization. Given below are the two scenarios discussed about those attacks. Scenario-1 is not the intention of the user to attack the network and Scenario-2 is a hacker attempting to steal the information.
Scenario-1:Company-A has a strict restricted policy for the employees personal laptops to connect to the network. User-A who recently joined in the organisation was not aware of the policy and connected his laptop to the network, immediately user-A laptop responding to the dhcp messages from other host because its configured with a dhcp server and started assigning the IP address of the core network, this leads to the major outage of the network because those IP addresses are conflicting with the core network IP address like SVI IP address in the core switches.
Scenario-2:Somehow a hacker entered into the organisation and started dhcp starvation attack by connecting his laptop to the network . DHCP starvation works by sending multiple dhcp requests with the fake source IP address to the legitimate dhcp server which cause the server to offer all the IP addresses and cause the pool to depleted and it would cause no IP addresses to be available to serve the endhosts, now the rogue dhcp server will start offering the fake IP addresses with the gateway itself so all the traffic will divert to the hacker laptop which leads to the MITM attack to steal the information and to redirect to the fake websites.


To begin enabling DHCP snooping, use the global command ip dhcp snooping as shown in Figure 1.

Figure 1 Global enablement of DHCP snooping on a Cisco switch.
Next, configure the VLANs you want to protect, using the command ip dhcp snooping vlan 99. In Figure 2, we're monitoring only VLAN 99, but we could easily include a range or sequence of VLANs, as shown in Figure 3.

Figure 2 Single VLAN example.

Figure 3 Multiple VLAN example.
Finally, we need to tell the switch the port to which our trusted DHCP server is directly connected, as shown in Figure 4.

Figure 4 Trusted port configuration for a legitimate DHCP server.
That's it for a basic configuration on a Cisco switch. To verify proper operation, use the IOS command show ip dhcp snooping as shown in Figure 5.
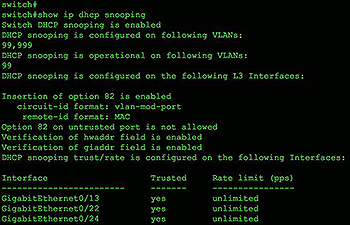
Figure 5 Verification of proper DHCP snooping configuration.
When DHCP Snooping is enabled it will begin to build a dynamic database containing an entry for each untrusted host with a leased IP address if the host is associated with a VLAN that has DHCP Snooping enabled. No entries are created for hosts connected to trusted interfaces.
Each entry in the binding database contains the following information:
- MAC address of the untrusted host
- Leased IP address of the untrusted host
- Lease time
- Binding type
VLAN number & interface the untrusted host is associated with
As untrusted hosts are assigned IP addresses from the trusted DHCP server the switch will automatically create new entries, update and cleanup the DHCP Snooping Binding Database.
For example, when an IP address lease expires or the switch receives a DHCPRELEASE message from the untrusted host, it will remove the specific entry from the database. On the other hand an entry will be created in the database if the switch sees a DHCPACK message from the trusted DHCP server acknowledging the assignment of an IP address to an untrusted host.
The show ip dhcp snooping binding command displays all entries inside the DHCP Snooping Binding Database:
Cat3560-Switch# show ip dhcp snooping binding
MacAddress IpAddress Lease(sec) Type VLAN Interface
------------------ --------------- ---------- ------------- ---- --------------------
D0:76:58:0C:BB:80 192.168.3.50 85228 dhcp-snooping 4 GigabitEthernet0/5
Total number of bindings: 1
The DHCP Snooping Binding Database is also used by other Layer2/3 security features such as Dynamic ARP Inspection which help protect the network against ARP Poisoning & ARP Spoofing attacks.