
FORTIGATE ACTIVE PASSIVE UPGRADE :
This blog post shows the detailed procedures to follow and to upgrade the firmware in the Fortigate Firewall. This Post was supports for any platform or the Version you are going to upgrade in the Fortigate Firewall
This Post was divided into three parts : Pre-Upgrade Process Upgrade Process Post-Upgrade Process
PRE UPGRADE STEPS:
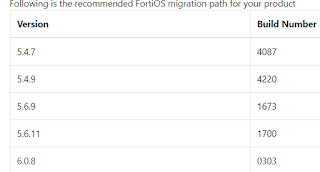
1 1) Go to the below website and check the Upgrade Path
https://docs.fortinet.com/upgrade-tool
2) Next Login to the Fortigate Console and check the HA Status ( it is to be In sync and higher Priority enabled for the required primary device)
3) Login to the Console and give the command
Config global – get sys ha status
Also check session pickup is in enable to avoid session interruptions in failover.
4) Download all the Firmware’s and the md5 files in the list and check with the software MD5sum.exe to avoid the download errors.
NOTE: Must and should configuration backup have to take for every version in the above steps because During an upgrade, there is a background process that takes the existing configuration file and changes any commands and settings to comply with the syntax of the new firmware. Skipping a firmware version that should have been part of the upgrade path means that the syntax of one or more commands didn’t get updated to work with the current firmware
5) Get ready with the Console access for the Disaster recovery plan, ensure you are able to login through console before upgrade.
UPGRADE PROCESS:
And click the Upgrade, Fortigate will upgrade the slave device first and make the slave reboot.
So there is no impact because the slave device is in the standby mode.
Once the slave device come up with the new firmware then the slave send an heartbeat message to make it as a primary and the old primary device upgrade itself and will automatically reboot.
Now the Primary is the Slave device
And the Secondary is the Old Primary device
We have enabled override and given the priority to the higher value for the old primary device(which is in the slave) so it automatically negotiates and become primary.
Check the get sys ha status command and check the sync status is in sync
Once it is in sync
Repeat the same process for all the versions until you get the required version 6.0.8
POST UPGRADE PROCESS:
1) Check both the devices are in the sync and the required device is in the active state
2) Check both the devices are in the sync and the required device is in the active state
Backup once and Check the traffic flow
1 1) Go to the below website and check the Upgrade Path
https://docs.fortinet.com/upgrade-tool
2) Next Login to the Fortigate Console and check the HA Status ( it is to be In sync and higher Priority enabled for the required primary device)
3) Login to the Console and give the command
Config global – get sys ha status
Also check session pickup is in enable to avoid session interruptions in failover.
4) Download all the Firmware’s and the md5 files in the list and check with the software MD5sum.exe to avoid the download errors.
NOTE: Must and should configuration backup have to take for every version in the above steps because During an upgrade, there is a background process that takes the existing configuration file and changes any commands and settings to comply with the syntax of the new firmware. Skipping a firmware version that should have been part of the upgrade path means that the syntax of one or more commands didn’t get updated to work with the current firmware
5) Get ready with the Console access for the Disaster recovery plan, ensure you are able to login through console before upgrade.
UPGRADE PROCESS:
https://docs.fortinet.com/upgrade-tool

2) Next Login to the Fortigate Console and check the HA Status ( it is to be In sync and higher Priority enabled for the required primary device)
3) Login to the Console and give the command
Config global – get sys ha status
Also check session pickup is in enable to avoid session interruptions in failover.
4) Download all the Firmware’s and the md5 files in the list and check with the software MD5sum.exe to avoid the download errors.
NOTE: Must and should configuration backup have to take for every version in the above steps because During an upgrade, there is a background process that takes the existing configuration file and changes any commands and settings to comply with the syntax of the new firmware. Skipping a firmware version that should have been part of the upgrade path means that the syntax of one or more commands didn’t get updated to work with the current firmware
5) Get ready with the Console access for the Disaster recovery plan, ensure you are able to login through console before upgrade.
UPGRADE PROCESS:
And click the Upgrade, Fortigate will upgrade the slave device first and make the slave reboot.
So there is no impact because the slave device is in the standby mode.
Once the slave device come up with the new firmware then the slave send an heartbeat message to make it as a primary and the old primary device upgrade itself and will automatically reboot.
Now the Primary is the Slave device
And the Secondary is the Old Primary device
We have enabled override and given the priority to the higher value for the old primary device(which is in the slave) so it automatically negotiates and become primary.
Check the get sys ha status command and check the sync status is in sync
Once it is in sync
Repeat the same process for all the versions until you get the required version 6.0.8
POST UPGRADE PROCESS:
Backup once and Check the traffic flow